
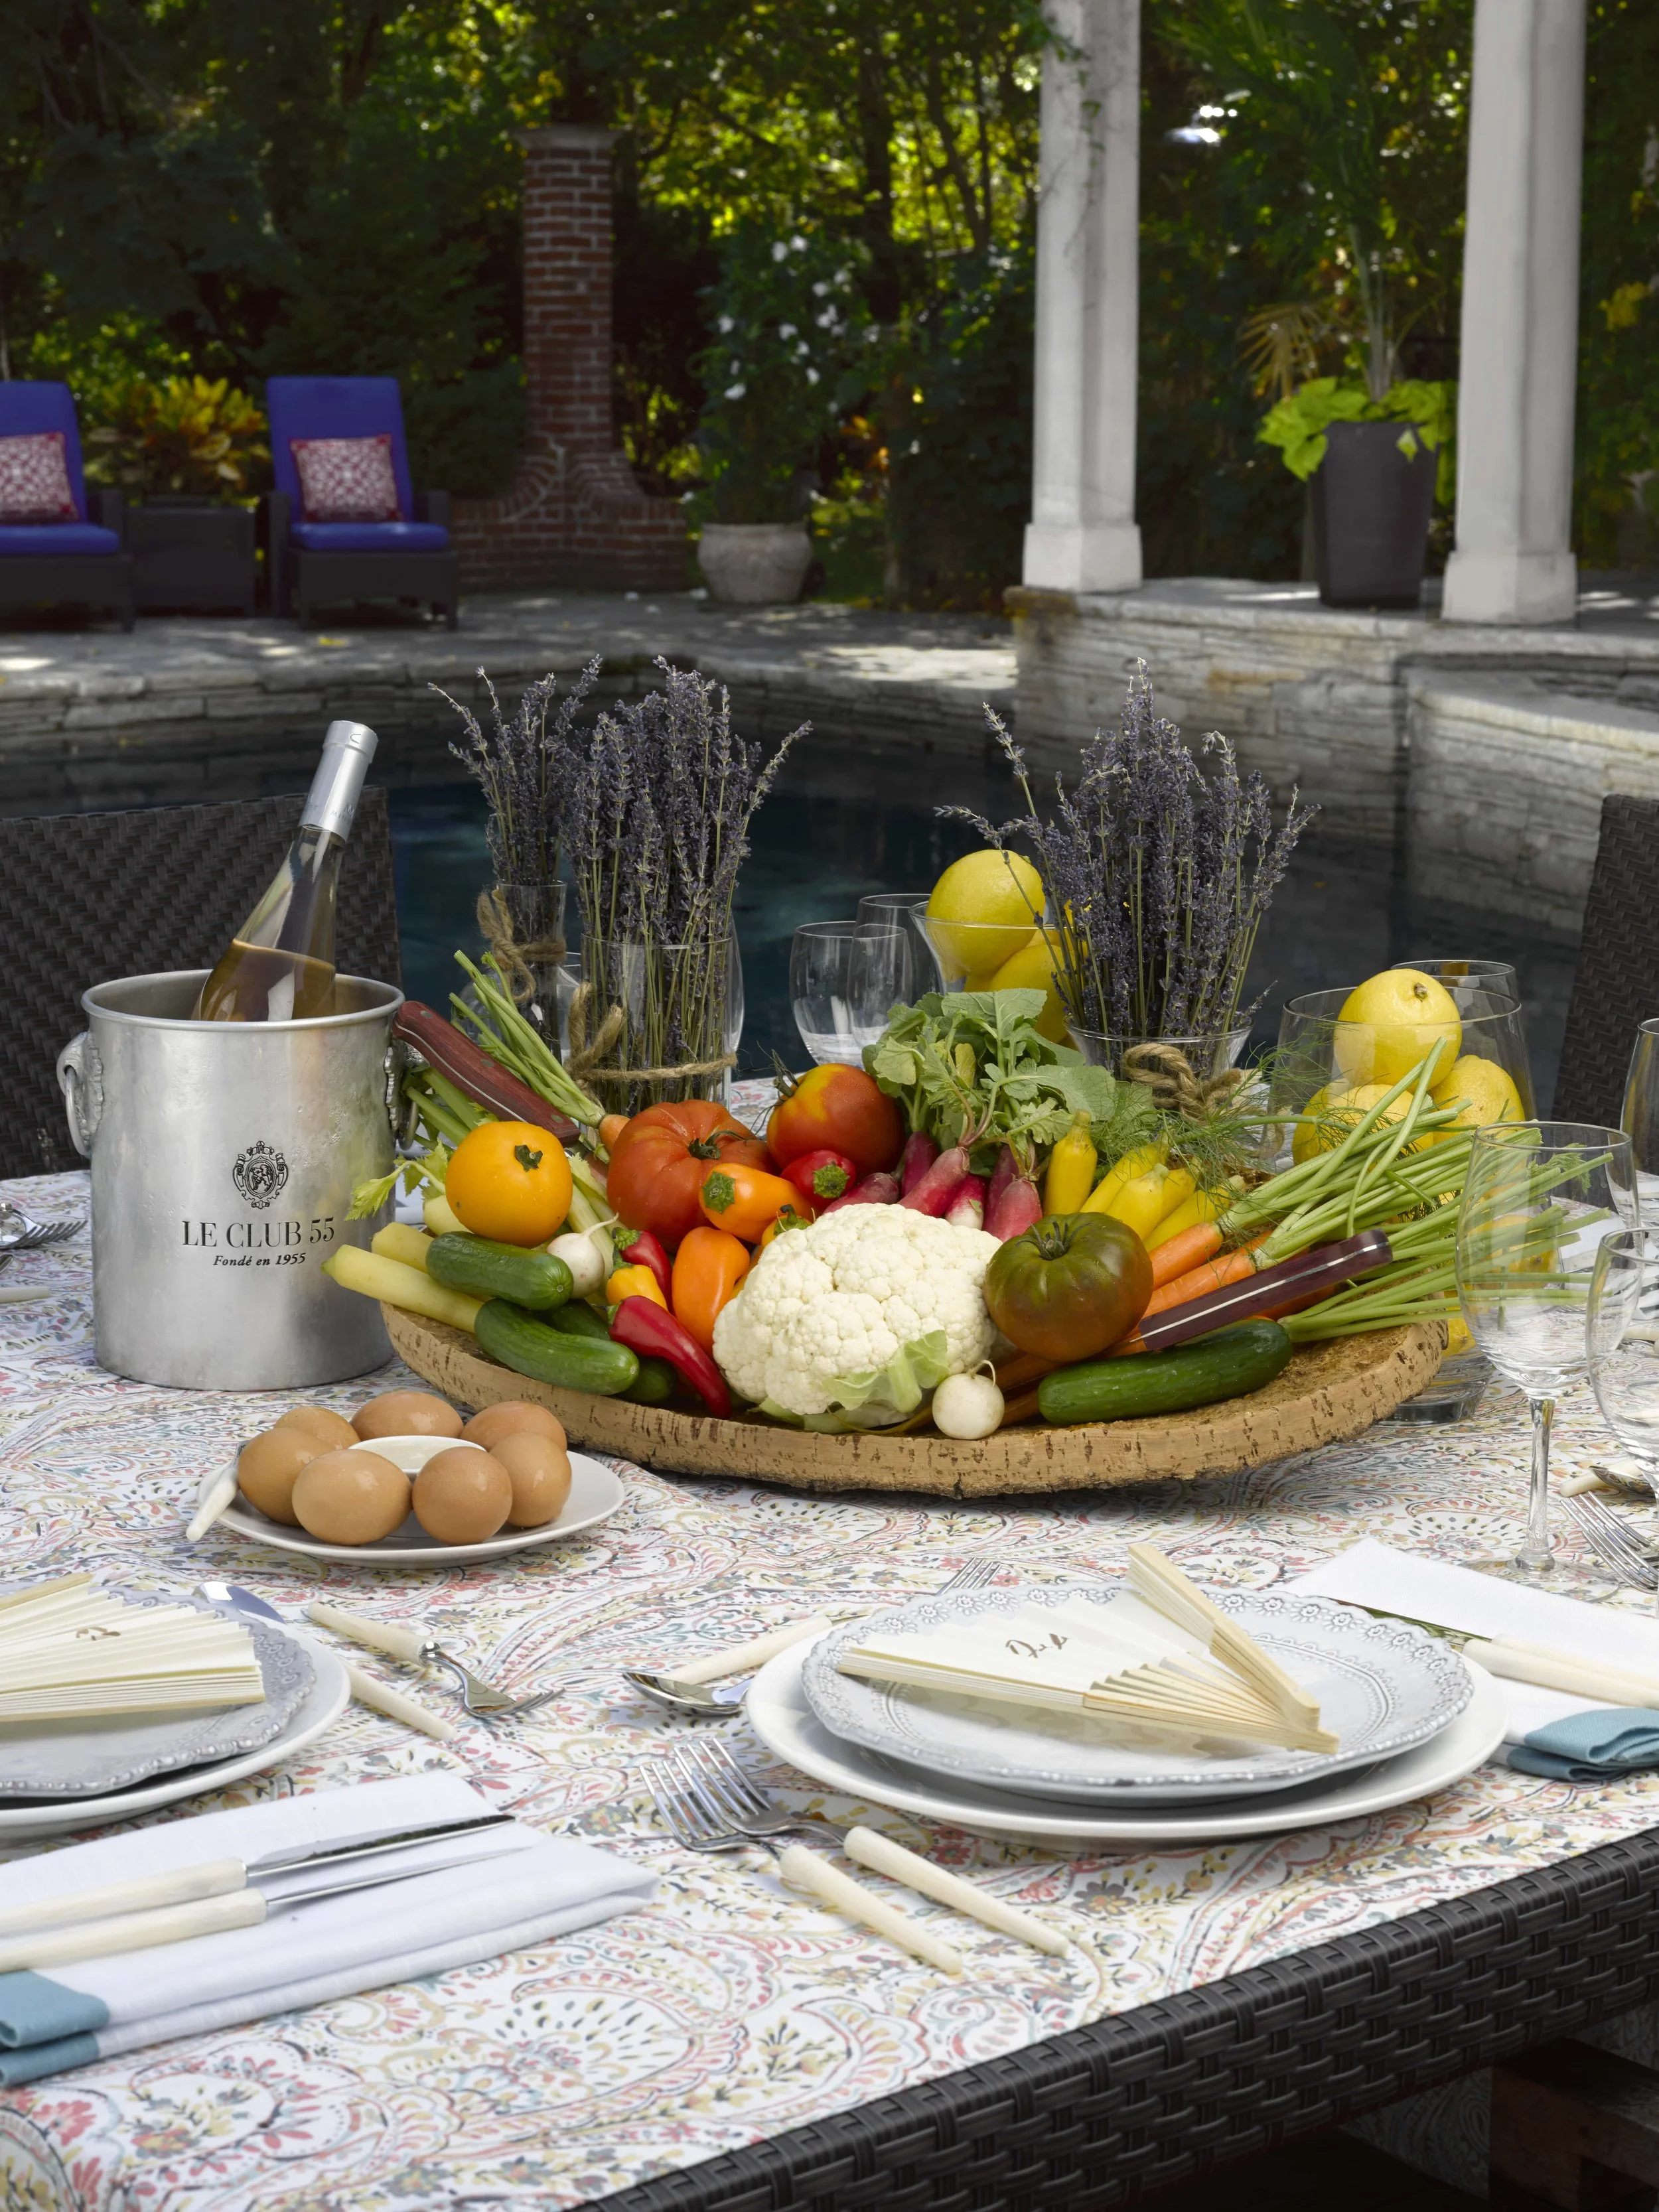


Who says Easter brunch has to be all about eggs and bunnies? 🐰🥚 Get ready to add some colour to your table with this vibrant and oh-so-healthy rainbow veggie board! 🌈🥕🥦 It’s not only gorgeous to look at, but it’s also packed with all the nutrients your body needs! 🙌
Dos:
- Do choose a variety of colourful veggies for maximum visual impact
- Do slice your veggies thinly and arrange them in a rainbow pattern
- Do serve with a tasty dip for extra flavour
Tips:
- To make your veggies last longer, store them in a container of water in the fridge
- Use a mix of raw and blanched veggies for a variety of textures
- Add fresh herbs and edible flowers for an extra pop of colour and flavour
Try this at your next brunch gathering, and be sure to tag us in your recreations!
A Perfect Spring Brunch
The blooms have arrived, as has spring! We are excited to venture on this month-long adventure of "A Perfect Spring Brunch"
Spring heralds not only warmer weather but also outdoor entertaining. The thought of lighter, brighter meals—and fewer layers—gets us excited about seeing friends we've missed over the last few months as the early blooms begin to appear. While it is our family tradition to host a large brunch during the holidays, we believe brunch should be more than an annual event. We also enjoy hosting weekend brunches because they are a more relaxed way of entertaining and make a regular Saturday or Sunday feel extra special.
We recommend hosting brunch outside whenever possible, weather permitting! Something is refreshing about dining in the garden, surrounded by fresh air and beautiful greenery. However, if you're hosting in the winter or the weather isn't cooperating with your plans, there's nothing wrong with hosting your brunch indoors.
Regarding brunch, we believe in the adage "the more, the merrier." Brunch is the ideal time to host people of all ages and interests, whether it's neighbours who hosted you previously or friends you haven't seen in a long time, especially during the Easter season.
Brunch is also easy to prepare. Our spring brunch features colourful and flavorful dishes, as well as bright, airy décor elements that instantly lift your spirits as you reconnect and start making plans for the summer months.
Don't let us worry you! Most of the items can be prepped ahead of time, and serving brunch buffet-style relieves the pressure of constantly serving and clearing plates. Mixtures and batters can be prepared the night before, and anything hot can be prepared ahead of time and kept warm in the oven until ready to serve.
When your guests arrive, all that will be left to do is set up the brunch buffet.
So, stay tuned while we take you all on a month-long adventure filled with an abundance of fresh ingredients, crisp cocktails, and a meal that celebrates everything that is spring!
Be sure to check us out on Instagram @sebandsheila!

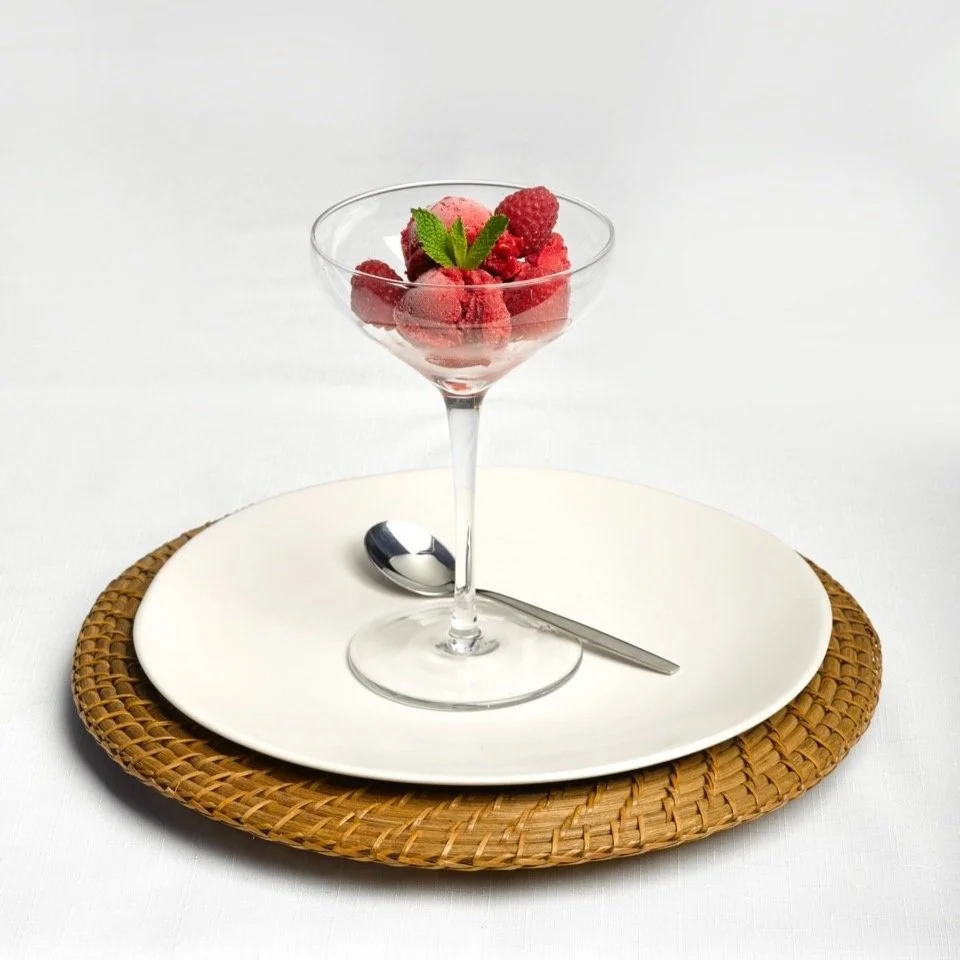
Lemon Tiramisu Recipe
Get ready to taste a slice of heaven with these lemon tiramisus! This delectable dessert is a perfect blend of tangy and sweet flavours, layered with creamy mascarpone cheese and fluffy ladyfingers soaked in zesty lemon syrup.
This dessert is a fan favourite in our home. It is one of those desserts to serve not only because of how fresh it is after a heavier meal but also because it can be prepared ahead of time!
Fun Fact: These Lemon Tiramisus can be served straight from the fridge!
Ingredients
LEMON SIMPLE SYRUP
2 cups granulated sugar
1 lemon, grated zest and juice of
TIRAMISU
2 cups whipping cream
3 Tbsp granulated sugar
24-32 ladyfinger cookies
1½ cups lemon simple syrup
1 cup store-bought lemon curd
1½ cups mascarpone softened
2 pints raspberries
10 mint leaves
Method
FOR THE SIMPLE SYRUP
Place the sugar, lemon zest, juice, and 2 cups of water in a saucepan set over medium heat. Bring to a simmer and stir to dissolve all the sugar. Remove from the heat, let cool to room temperature, and refrigerate in the saucepan until ready to use.
FOR THE TIRAMISU
1. Set aside 6 to 8 rocks glasses or other short glasses for serving. We're flexible with the size of glass you use, and in the worst case, you've got one left over.
2. Using a stand mixer or handheld mixer, beat the cream and sugar on high speed until fluffy and stiff peaks form, about 8 minutes.
3. Dip 2 ladyfinger cookies in the simple syrup and place them in the bottom of a glass, breaking them in half if required.
4. Layer 3 Tbsp of lemon curd, 2 Tbsp mascarpone, and 3 Tbsp of whipped cream on top of the ladyfinger cookies. Dip 2 more ladyfingers in the syrup and place them overtop. Repeat with the remaining glasses.
5. Garnish each glass with raspberries and mint. Refrigerate for 2 hours or ideally overnight before serving, and serve chilled.
Treat yourself and your guests to a treat that will leave everyone craving more!
Be sure to check us out on Instagram @sebandsheila!

Spicy Arrabbiata Sauce with Mussels and Shrimp over Pasta Recipe
As the canapés disappear, we head over to the table to take our seats for the main course: mussels and shrimp over pasta with a spicy arrabbiata sauce.
The preparation is easy, but the result is spectacular. Although the pasta may appear to be simple, the mussels and shrimp spice things up. Another benefit of this recipe is that it can be scaled up or down based on the number of guests, making it a dish that will undoubtedly become a staple on your menu.
Pro tip: This recipe lends itself to being tweaked as you get more familiar with it; in other words, the more you make it, the more you love it!
-
Ingredients
1 lb long pasta (spaghetti or fettuccine would be ideal)
½ cup olive oil, divided 1 yellow onion, finely diced
6 garlic cloves, minced
2 (each 32 oz) jars of arrabbiata or tomato sauce
4 lb mussels, pre-washed and debarred
2 lb pre-cooked shrimp (16/20 count)
1 cup curly parsley, finely chopped
2 tsp chilli flakes, optional
Method
- Bring a large pot of salted water to a boil over high heat. Cook the pasta according to the package directions. Drain, toss with ¼ cup of the oil, and set aside while you prepare the sauce.
- In a large pan with a tight-fitting lid, heat the remaining ¼ cup of oil over medium heat. Add the onions and garlic and cook, stirring occasionally, until translucent, about 5 minutes.
- Add the sauce and increase the heat to high; bring the sauce to a simmer, stirring occasionally. Once it's simmering, add the mussels and shrimp and stir to ensure that they're coated in the sauce.
- Cover with the lid and cook until all the mussels have opened about 5 minutes. Discard any that haven't been opened.
- Divide the pasta among individual bowls and top with the mussels and shrimp sauce. Sprinkle some parsley and chili flakes (if using) over top before serving.
This family-style meal is definitely one to indulge in. It is a seafood lover's paradise!
Be sure to check us out on Instagram @sebandsheila!

Mussel Dinner: Do's and Don'ts
As frequent dinner party hosts, we know that mussels are a crowd-pleaser that never fails to impress our guests. However, we recognize the importance of adhering to the dos and don'ts of cooking mussels in order to ensure that they are safe, delicious, and perfectly cooked every time.
Do's:
- Buy fresh mussels: Always choose live, fresh mussels that are tightly closed or close when tapped. Avoid any that are open or damaged.
- Clean the mussels: Rinse the mussels under cold running water and remove any beards or barnacles.
- Cook mussels in a flavorful liquid: use a broth, wine, or sauce to add flavour to the mussels while cooking.
- Cook until the shells open: Boil or steam the mussels until the shells open, which usually takes around 3-5 minutes.
Serve the mussels hot with some crusty bread to soak up the flavorful juices.
Don'ts:
- Do not soak the mussels: Do not soak the mussels in water as it can kill them.
- Do not overcook: Overcooking can cause the mussels to become tough and rubbery.
- Do not use closed mussels: discard any mussels that remain closed after cooking, as they may not be safe to eat.
- Do not use strong flavours: Avoid using strong-flavoured ingredients that may overpower the natural taste of the mussels.
- Do not reheat: Do not reheat cooked mussels as they can become tough and chewy.
Anything we're forgetting? Share your mussel cooking tips in the comments below!
Be sure to check us out on Instagram @sebandsheila!
Cucumber Loonies Salad Recipe
Looking for a starter that’s a little more elevated than a standard green salad? Well, look no further than these mouth-watering cucumber loonies!
A simple yet elegant starter with the perfect balance of crisp cucumber, wine vinegar, and poppy seeds They are the ideal way to whet your appetite before diving into your mussel dinner.
These bite-sized beauties are the perfect conversation starter for any party—just watch as your guests try to figure out what a ‘loonie’ is!
Pair them with our classic Boulevardier Cocktail and watch as the good times roll. Trust us: You won’t want to miss out on this fun and flavorful combo.
-
Cucumber Loonies Salad Recipe
Ingredients
5 miniature cucumbers
1½ Tbsp rice wine vinegar
2 tsp poppy or black sesame seeds
Sea salt and black pepper
Steps
1. Peel and slice the cucumbers into 1-inch-thick rounds.
2. In a medium bowl, toss the cucumbers with the vinegar and refrigerate, uncovered, for at least 30 minutes and up to 3 hours.
3. Transfer to a serving bowl, sprinkle the poppy seeds overtop, season with salt and pepper, and serve with toothpicks on the side as flatware.
Be sure to check us out on Instagram @sebandsheila!

The Boulevardier Cocktail Recipe
Mussels can be a difficult meal to pair cocktails with, so we recommend serving a classic cocktail alongside a variety of wines for this dinner.
The Boulevardier Cocktail will be our cocktail choice for this dinner. This is similar to a Negroni, but it is made with whisky instead of gin. It is simple to prepare and serve, making it the ideal drink to try before moving on to wine because, while not overpowering, one before dinner is usually sufficient.
Don’t miss out on the perfect start to your meal—try our simple and delicious cocktail before exploring the world of wine.
Boulevardier Cocktail Recipe:
Ingredients
1½ oz Bourbon Whiskey
1 oz sweet or semi-sweet vermouth
1 oz Luxardo Bitter or Campari
Ice
Garnish: Orange Peel
Steps
1. Stir the bourbon, vermouth, and Luxardo bitter together in a cocktail shaker.
2. Shake vigorously for 20–30 seconds.
3. Strain over ice into an old-fashioned glass.
4. Express the oils from an orange peel over the drink, rub the peel along the rim of the glass, and drop it into the cocktail.
Cheers to good food, great drinks, and even better company!
Be sure to check us out on Instagram @sebandsheila!
How to Elevate Your Place Setting Accent
You know we love our place-setting accents, and now that the butter is curled, we have a perfect idea! 🥖

To add a personal touch to the table, we added customized miniature baguettes wrapped in craft paper. Along with being your guests' favourite social media shot of the night, mini baguettes will also give them something to nibble on with every course. Whether they use it to sop up all the sauce and delicious juices from the mussels or slather it with some salted butter, a fresh baguette is always a crowd-pleaser.

This one is too easy not to try!
How to Make Decorative Butter Curls with a Curler
A mussel dinner is not complete without a side of warm bread, and a side of warm bread is not complete without butter! Elevate the experience by pre-batching butter curls. These delicious curls of golden butter are the perfect garnish to add a touch of elegance and sophistication to your meal. Adding a rich and creamy flavour to that soft, pillowy bread.
Making these delicate curls is as simple as it sounds; all that’s needed is a butter curler or a special knife. Impressing your guests has really never been easier! 🧈✨
Ingredients & Tools:
Butter curler (or melon baller)
A stick of butter
Bowl of hot water
Bowl of ice water
Steps:
Place the butter curler in hot water to warm the metal. Let the butter sit out for 5–10 minutes before making curls.
Holding the end of the butter stick with one hand, place the curler hook at the end of the butter stick, and pull the curler across the top of the butter.
Drop the finished curl into iced water.
Dip the curler into hot water before starting each curl. Repeat on all sides of the butter stick.
Keep refrigerated until ready to use.
We like to place a small bowl of them at each setting, making it much easier for all guests to access and use them throughout the meal.
Try this #hostinghack at your next gathering, and be sure to tag us in your recreations!

Radishes with Butter and Gourmet Salts Recipe
When we're hosting a mussels dinner, we like to keep appetizers to a minimum so our guests don't fill up before the main course. A few light, colourful, and European-inspired canapés will help tide your guests over until the mussels are served.
One of these includes radishes with butter and gourmet salts. This elegant French appetizer is as simple as it gets and comes together in a snap. Fresh, vibrant radishes are pure heaven when swirled in creamy butter and dipped in crunchy sea salt. Now you may be thinking, "Is that it? My answer is yes. The butter and salt round out the spiciness of the radishes, making a perfect bite. Don't you believe us? Try it for yourself!
Ingredients:
2 bunches of French radishes, stems on
1 cup of European-style butter, softened - Tip: European butter is typically churned for longer than North American and has a higher fat content, resulting in a richer, softer texture with a brighter colour.
1/2 Maldon seas salt
Gourmet Salts:
Herbes De Provence Blend
1/2 cup kosher salt
1 1/2 tsp herbes de Provence
Pink Salt Blend
1/2 cup pink Himalayan salt
1 1/2 tsp sweet paprika
To Serve:
Arrange radishes on a large platter. Place the butter, Maldon salt, and salt blends in small bowls and set the bowls on the platter. Guests can dip the radishes in the butter, then in the salt of their choice.
This is the traditional way to enjoy radishes, and in our opinion, it's way better than eating them plain!
Be sure to share your creations with us by tagging us on Instagram @sebandsheila!

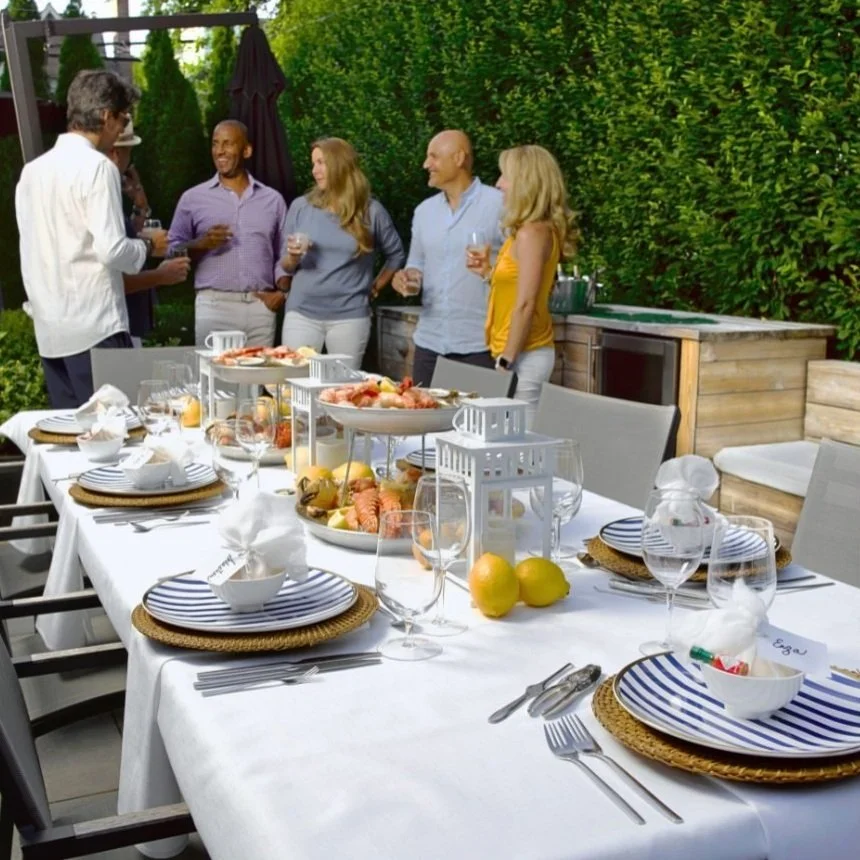
Tips on How to Set a Table for a Family-style Meal
As we step into March, it's totally normal to start dreaming about the warmer months ahead - but first, we need to deal with the temperature rollercoaster that this transitional time usually brings.
While our brains are daydreaming of al fresco dining, this is still a time to stay cozy indoors surrounded by friends and family. That's why we're giving you an inside look at one of our favourite meals to gather around: A Mussels Dinner.
Some people only order mussels when dining out at a restaurant because of how intimidating the preparation seems, but if you use a simple recipe and straightforward ingredients, it isn't nearly as difficult as you might think.
Our love for this dish stems from our time spent in France and Seb's family heritage. His mother grew up in Brittany, on the coast of the English Channel in the north of France - a place is known for its amazing cuisine and fresh seafood. To this day, nothing satisfies our cravings for cuisine quite like mussels do.

First, as always, we set the table. Family-style meals like this one are all about comfort, so instead of going above and beyond to set an extravagant table, we like to set a simple, rustic tablescape. For a mussels dinner, we like to use wooden cutting boards instead of charge plates or serving platters. Not only does this add to the rustic theme, but it also alleviates the need for a tablecloth, as it gives the table some added depth and visual interest.
When you're setting the table for a large group it's important to plan well in advance and make sure that you leave some open space to help balance the table. Florals are one of the easiest ways to overcrowd your table, so for big dinners like this one, we recommend having three or four small arrangements of flowers that you can position around the table with ease. W like incorporating rich colours like burgundies, dark reds, and dark greens to stay within the rustic theme.
Now that the table is set, we invite you to take a seat and follow along as we walk you through this special evening all month long!
Be sure to check us out on Instagram @sebandsheila!

Tips on Planning For a Bar in a Small Space
When it comes to planning your bar for a small space gathering we only have one top tip - go batched!
Trying to set up a full bar will create a bottleneck for guests and take up valuable counter space. Instead, stock your fridge with beer and wine, and create a signature batched cocktail for the night that you can pre-prep ahead and allow guests to serve themselves as needed!
Not sure where to start for a batched version? Boozy iced tea is a great place to start since it can be as easy as simply adding alcohol. We of course got a little fancy with this Spiked Hibiscus Iced Tea 🌺
Ingredients (for a pitcher - 8 servings)
1/2 cup dried hibiscus flowers
1 cup hot water
10 ounces vodka
6 ounces of honey simple syrup
Lemonade
Sliced lime for garnish
Ice
How-to:
Place the hibiscus flowers into the hot water. Use a spoon to submerge the flowers and let them steep for 10 to 15 minutes. Stir occasionally to help release the pigment and flavour.
Use your spoon to remove the flowers from the water, reserving two flowers for garnish.
Fill two glasses with ice. Place a flower on top of each glass.
Pour 1 1/4 ounces of vodka and 3/4 ounce of simple syrup into each glass. Fill almost to the top with lemonade.
Pour the hibiscus tea over the ice and let it bleed into the cocktail.
Serve as is, or stir the cocktail to distribute the tea.
What's your favourite batched cocktail?
Be sure to share your creations with us by tagging us on Instagram @sebandsheila!

Tips on Creating a 'Build-Your-Own' Bruschetta Bar
There's nothing like a beautiful 'build-your-own' station to keep your guests well-fed and entertained. This concept is super trendy in entertaining nowadays and comes in many shapes and sizes. Today it's all about the Build Your Own Bruschetta Bar!
We took the idea of the classic bruschetta, which everyone loves, and turned it into a self-serve grazing station. This format allows guests to choose between three toppings in the ultimate all-encompassing platter. It’s a fun and creative way to let your party guests mix and match ingredients to create their unique toasts!
For toppings, feel free to go for whatever match your taste preferences, but you’ll want to choose spreads that can be served cold or at room temperature, so you can prep ahead and not have to keep going to the kitchen to reheat the food during the party. We think our three would suit any palate: Classic Tomato Bruschetta, Herb & Garlic Mushrooms, and Marinated Zucchini Ribbons.
When it comes to bread, we always gravitate to the classic crostini.
For the full recipes, head to page 39 of Eatertainment! Don't have a copy yet? Check out the link in our bio for a retailer near you.
Be sure to check us out on Instagram @sebandsheila!

Tips on Cooking for Guests in a Small Living Space
Let's talk about food.
Cooking for a group of people in a smaller space can be a daunting thought. With less counter, fridge, & oven space - being strategic about both your menu and prep is key.
Your room party style will dictate the menu. Certain things are easier to eat perched on a couch than others: Pasta salad? Easy-peasy. Anything that requires a steak knife?
Then there’s the temperature to consider. For example, don't plan for a full menu of warm items that won't fit in the oven right before guests arrive. Instead strike balance between cool, warm, and room temperature items. Serve a salad or cold appetizer at the start to welcome guests while you wait for the hot items to come out of the oven. Hopefully, this will keep any single spot in your kitchen from getting overcrowded and make it easier for a host to serve.
Prepping is imperative in a smaller space since you will likely lose a portion of your standing room in your kitchen once guests arrive (it inherently will become an area where guests stay and mingle).
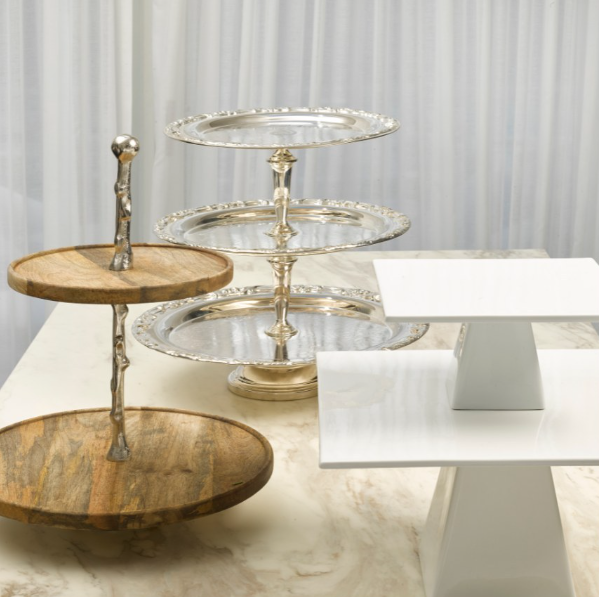
The key to successful prepping is simple, do as much as you can ahead of time. We take prepping very seriously in the Centner house. From chopping veggies and mixing dips to setting the table and laying & labelling all the platters we want to use for each dish. We even made it an important part of every chapter of Eatertainment - The Party Countdown, breaking down anything and everything that can be done a week, days, and hours before your event.
Speaking of platters, the last step of food is serving it! With limited counter space, we like to say: if you can't move outward, why not upward? Tiered trays should be in any host's arsenal, but they also take up decent storage space, so understandably might not be something our condo and apartment entertainers have on hand. Luckily, they are easy to DIY! All you need is two plates, 1 small & 1 larger, and a cup. Starting with the large plate as the base, place the cup centred on top, and finish with the smaller plate. Feel free to use some double-sided tape if you are worried about stability.
Now that you've got your plan all laid out, all there's left to do is get to work!
Be sure to check us out on Instagram @sebandsheila!

Tips for Entertaining in a Small Space
Successfully entertaining in a small space comes down to balancing two opposing concepts: being organized and going with the flow. You're probably wondering what we mean by that...
For example, it's important to have a clear vision of the event - this is the being organized part. You need to decide whether your gathering is going to be planned as a sit-down meal or a standing-up-and-snacking affair—anything in between is too tricky in a small space. That decision will lead the following decisions: your menu and setup. Try your best to imagine the guests' experience and the flow of the event.
Once you've laid out the general roadmap for the night - that's where you need to let the reigns hang loose a bit. Here are two ways we like to forgo a bit of control and actually help finalize your 'set plans':
Lose the strict guest list:
Don’t let the size of your space deter you from having the guest list you want. Instead of fretting that those extra 3-4 people may not 'fit', just invite who you want! As mentioned above, YOU get to decide the layout of the night. To us, a full room feels festive, while a big empty space with little clusters of guests can be a little sad. We can say with confidence that most don't mind a cozy atmosphere, they’re just delighted someone invited them over and is cooking for them!
Make the timing lose:
An open-house style gathering is a great way to get more people into your space - without worrying about running out of it. This allows for more of a flow of people rather than a set arrival and departure time for a large group. Some trickle in at the beginning, some later, and everyone is free to leave at the time that works best for them.
While the thought of these two tips may stress some of our fellow hosts out, we promise it's far less of a headache in the end when it comes to this type of party!
Be sure to check us out on Instagram @sebandsheila!

How to Entertain in a Small Space
As we enter the back half of February, we dive into one of our most frequently asked questions - how can you entertain in a small space?
With many people confined to apartment and condo living these days (us now included), this has become a hot topic in the entertainment world. The misconception is that you can't entertain as effectively in a smaller space - which is simply not true! It may require a little more planning and foresight, but it 100% can be done! That's why we will spend the remainder of the month sharing our top tips around successfully scaling down your next party!
Step 1: Decor.
Since we're working with less space, a minimalist approach is best. An easy trick to save money and space with florals: buy one large bouquet, split it into smaller vases, and sprinkle the arrangements throughout the space. Ideally, in the areas you want your guests to mingle. So in the kitchen by the drink station, on the coffee table, etc. Allowing the blooms to act both as decor pieces and roadmap indicators for your guests!
Not into florals? The same can be done with candles! Add touches of warmth throughout the space with small groupings of candles (we like to stick to 3s).
Show guests, you've made the effort to decorate for the gathering - without taking up precious space. The good news is that even tiny touches go a long way in a small space!
What are your favourite ways to save space with decor?
Be sure to check us out on Instagram @sebandsheila!

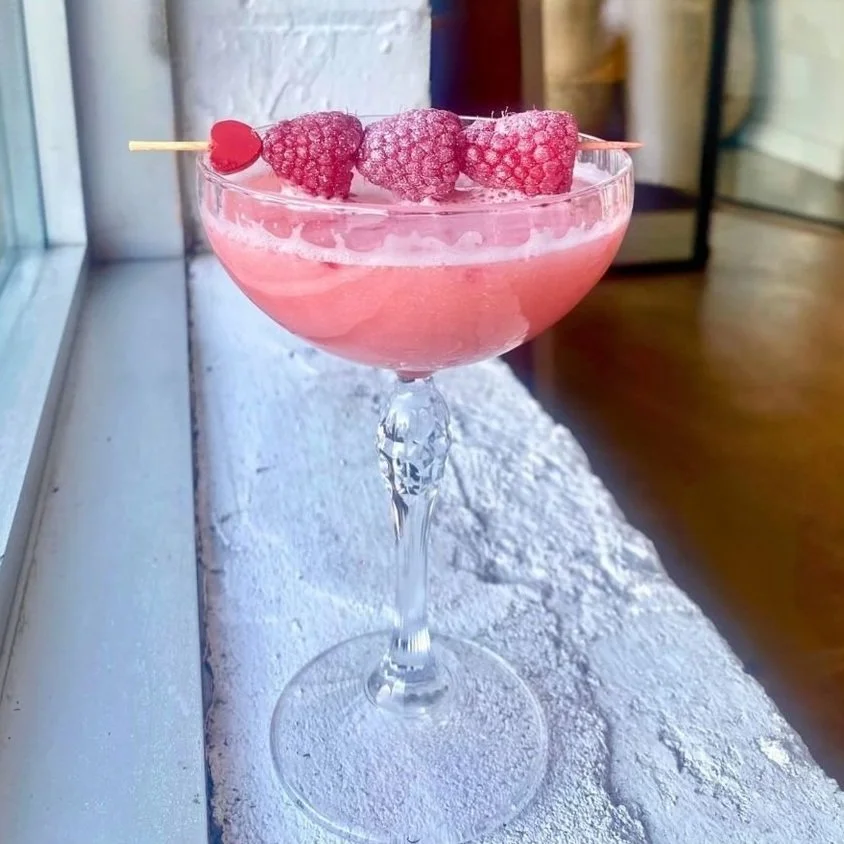
Grapefruit-flavoured Pearls Cocktail Caviar
You all know our love for caviar, so when we saw this product, we knew it would be right up our alley - Cocktail Caviar!!
Now don't get the wrong idea - there's nothing fishy about this caviar, instead, they're little pearls bursting with fruity flavour! Not dissimilar to boba pearls, they simply add the flavour of choice to any cocktail!
Try this: make your next champagne toast special with a garnish of a rose petal filled with pearls ready to add to the bubbly!
We've linked our favourite grapefruit-flavoured pearls in our bio!
Be sure to check us out on Instagram @sebandsheila!

Valentine’s Strawberry Swiss Roll Recipe
The Strawberry Swiss Roll is a delicious combination of moist sponge cake, whipped filling and sweet strawberries. The perfect treat for your 14th celebrations! 🍓 ♥️
Ingredients:
4 eggs yolks at room temperature
4 eggs whites at room temperature
2 tbsp melted butter
3 tbsp milk
1 1/2 tbsp lemon zest
2 tsp vanilla
1 cup granulated sugar
3/4 cup all-purpose flour
2 tbsp cornstarch
1 tsp baking powder
1/4 tsp salt
1/2 cup slivered almonds
Filling:
1 ½ cups heavy cream cold
½ cup powdered sugar
1 tsp vanilla extract
1 tbsp lemon zest
3 cups strawberries, sliced (1 cup for garnishing)
How-to:
Cake
1. Preheat the oven to 350. Grease the cake pan with cooking spray or butter then lay a piece of parchment paper and lightly spray the top of the parchment paper.
2. Whisk egg yolks, melted butter, milk, lemon zest, vanilla, and ½ of the granulated sugar until combined.
3. In a small bowl whisk together the flour, cornstarch, baking powder, and salt until combined.
4. Whisk dry and wet ingredients together until combined.
5. Using a hand mixer and medium bowl or stand mixer, beat the egg whites on high until soft peaks form. Add in the other half of the granulated sugar and continue beating for another 1-2 minutes.
6. Using a spatula, fold the egg whites into the cake batter until fully combined.
7. Pour batter onto a prepared baking pan and bake for 13-15 minutes or until slightly golden brown.
8. Lay a tea towel on a flat surface and lightly dust with powdered sugar and set aside.
9. When the cake is done immediately invert the cake onto the towel. Remove the parchment paper and then roll the cake in the towel starting at one end. Place on a wire rack to cool completely.
Filling
1. Using a hand or stand mixer with a whisk attachment, beat cold heavy cream, powdered sugar, lemon zest, and vanilla extract until stiff peaks.
2. When the cake has cooled gently unroll and spread the filling evenly over the cake. Add the sliced strawberries on top and carefully roll the cake back up. Cover with plastic wrap and refrigerate for at least 1 hour.
3. Dust with powdered sugar, strawberries, and almonds, and serve.
Be sure to check us out on Instagram @sebandsheila!
DIY Ruffled-Heart Valentines
Make Ruffled-Heart Valentines with us! 💜
These origami-style hearts are super easy and add that classic Valentine's motif interestingly. While we made sure to choose rosy hues of scrapbook paper, we've mixed in some greens and yellows to avoid overdoing it with reds and pinks.
How-to:
Cut out capsule/pill shapes from your paper of choice. The easiest way to get your perfect capsule shape is to find a circle to trace (a can of beans for example), trace two circles about 2.5 inches apart, then connect them with two straight lines at the top and bottom.
Fold paper accordion-style, creasing every ⅜ inch or so.
Fold the creased paper in half to form the tip of the heart. Fan out to create the heart’s rounded top, then secure the edges of the paper at the center of the crease with clear tape.
Now you just have to decide how you want to use them! It could be as simple as placing them at guest's place settings, scattering them throughout the tablescape, or even incorporating some into your grazing station! The creative freedom is yours!
Be sure to share your creations with us by tagging us on Instagram @sebandsheila!

Simple Dame Blanche Recipe
You didn't think we would forget those of you with a sweet tooth to did you?
Dessert is rarely skipped in the Centner house, so of course every chapter of Eatertainment finishes a delicious confection!
Since the Winter Warm-Up is all about hearty and filling starters and mains, we kept dessert simple! French Vanilla Ice Cream with Homemade Dark Chocolate Sauce, aka 'Dame Blanche' 😋
This is one of the most universally loved winter desserts and is sure to be a hit regardless of how full your guests may be at this point. The name comes from an old French tale. The story goes that a ghost named Dame Blanche would block a bridge in Normandy and that only those who stopped to dance with her would be allowed to pass. Seb's mom used to tell him and his brother this story as they enjoyed their ice cream and chocolate sauce.
Ingredients:
1 1/2 pints of French Vanilla ice cream
1/3 cup light corn syrup
1/3 cocoa powder
2 1/2 oz dark chocolate, finely chopped
How-To:
1. Place 1 1/4 cups of water in a small saucepan over medium-high heat. Add the corn syrup and cocoa powder and bring to a boil, whisking constantly.
2. Remove from the heat and stir in the chocolate until completely melted.
3. Allow the chocolate to cool to room temperature, for about 15 minutes, and serve over the vanilla ice cream.
Bonus: If you already have your copy of Eatertainment, we've also included a recipe for baked stone fruit that can be added to the dessert!
Be sure to check us out on Instagram @sebandsheila!